在使用 Style Dictionary 管理 Design Token中简单介绍了Style Dictionary及其使用,本文将介绍Style Dictionary在团队中的使用经验。
区分Token 的类型和层级
分类的工作由设计师主导。 Figma Tokens 插件默认提供的面板中,将token分为一下几类:Color 颜色、Shadow 投影、Typography 字体样式、Size 尺寸、Space 间距、Border Radius (半径) 描边圆角、Border Width (宽度) 描边宽度、 Opacity (混浊) 透明度等。参考W3C的草案并结合团队实际情况,按照属性维度,最终得出如下分类,作为全局Token使用。

$blue-400 = #2680EB;
$border-style-dashed = "dash";
$sizing-14 = "14px";
一般来说,会将Token按照在此基础上,输出更加语义化的组件Token,方便使用。我们将其分为三个层级。
全局Token:保存设计中最原始的属性值,比如#ff0 、2px、50%。它们的名称能直接体现出其保存的值和代表的意义,比如palette-brand-blue-500、spacing-8、border-radius-6。
语义Token:引用了全局token,它们的值一定是另外一个token的引用。它们的名字能直接体现出其使用的场景,比如color-background。
组件Token:引用语义Token,在特定组件中使用。在开发组件时,只需要关心组件token。其背后的引用关系可以随时调整,对组件开发来说是无感知的。比如按钮的颜组件Token是button-color ,依次引用的语义Token color-background和全局Token palette-brand-blue-500。二者的变化不会影响组件的开发。
约定 Token 命名规范
当层级关系明确之后,按照组件划分,依次定义出组件需要使用的Token。在经历了多次探讨和实验之后,最后得出了一个团队认可的命名规范。
{component}-{category}-{type}-{status}-{state}-{property}
就以颜色token为例:
- 全局token提供了一系列来自基础色板的颜色token,比如
palette-brand-blue-500。 - 在它的基础上使用别名
semantic-brand-color-default让token语义化。 - 主按钮的背景色的Token是
button-color-primary-normal-default-background,次级按钮的背景色的Token是button-color-secondary-normal-default-background。
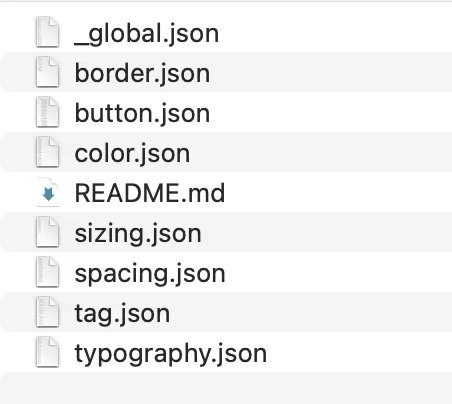
最后设计师交付给开发的Token文件通过git托管在内部仓库中,其包含的内容如下图所示
将Token转换成样式代码
项目使用Sass作为CSS的预处理器,Token转换成Sass变量,就能在项目中使用了。但是我选择使用CSS自定义属性,在Sass文件中无缝使用的同时,方便在浏览器调试。因为CSS自定义属性没有编译过程。Style dictionary 内置了对应的 format配置,使用非常方便。
// index.js
const StyleDictionary = require('style-dictionary')
const config = {
  'source': ['./tokens/**/*.json'],
  'platforms': {
    'css': {
      'transformGroup': 'css',
      'buildPath': './output',
      'files': [
        {
          'destination': 'css/variables.css',
          'format': 'css/variables',
        }
      ]
    }
  }
}

StyleDictionary.extend(baseConfig)
StyleDictionary.buildAllPlatforms()
Style Dictionary 会将source中找到的文件,转换输出到output/css/variables.css。
转换单位
但是实际情况往往会更加复杂一些。由于工具的限制,设计师导出的值需要再转换处理一次,比如单位的处理。这时候 Transform 就派上用场了。考虑下面这个例子,设计师导出了 sizing.json 和 spacing.json。
{
  "sizing": {
    "10": {
      "value": "10",
      "type": "sizing"
    },
    "12": {
      "value": "12",
      "type": "sizing"
    },
    "14": {
      "value": "14",
      "type": "sizing"
    },
    "16": {
      "value": "16",
      "type": "sizing"
    },
    "18": {
      "value": "18",
      "type": "sizing"
    },
    "20": {
      "value": "20",
      "type": "sizing"
    },
    "22": {
      "value": "22",
      "type": "sizing"
    },
    "24": {
      "value": "24",
      "type": "sizing"
    },
    "28": {
      "value": "28",
      "type": "sizing"
    },
    "32": {
      "value": "32",
      "type": "sizing"
    },
    "36": {
      "value": "36",
      "type": "sizing"
    },
    "40": {
      "value": "40",
      "type": "sizing"
    },
    "48": {
      "value": "48",
      "type": "sizing"
    }
  }
}
{
  "spacing": {
    "0": {
      "value": "{spacing.8} * 0",
      "type": "spacing",
      "description": "0px"
    },
    "2": {
      "value": "{spacing.8} * 0.25",
      "type": "spacing",
      "description": "2px"
    },
    "4": {
      "value": "{spacing.8} * 0.5",
      "type": "spacing",
      "description": "4px"
    },
    "6": {
      "value": "{spacing.8} * 0.75",
      "type": "spacing",
      "description": "6px"
    },
    "8": {
      "value": "8",
      "type": "spacing",
      "description": "8px,主间距"
    },
    "12": {
      "value": "{spacing.8} * 1.5",
      "type": "spacing",
      "description": "12px"
    },
    "16": {
      "value": "{spacing.8} * 2",
      "type": "spacing",
      "description": "16px"
    },
    "20": {
      "value": "{spacing.8} * 2.5",
      "type": "spacing",
      "description": "20px"
    },
    "24": {
      "value": "{spacing.8} * 3",
      "type": "spacing",
      "description": "24px"
    },
    "32": {
      "value": "{spacing.8} * 4",
      "type": "spacing",
      "description": "32px"
    },
    "40": {
      "value": "{spacing.8} * 5",
      "type": "spacing",
      "description": "40px"
    },
    "48": {
      "value": "{spacing.8} * 6",
      "type": "spacing",
      "description": "48px"
    },
    "64": {
      "value": "{spacing.8} * 8",
      "type": "spacing",
      "description": "64px"
    },
    "80": {
      "value": "{spacing.8} * 10",
      "type": "spacing",
      "description": "80px"
    },
    "96": {
      "value": "{spacing.8} * 12",
      "type": "spacing",
      "description": "96px"
    },
    "160": {
      "value": "{spacing.8} * 20",
      "type": "spacing",
      "description": "160px"
    },
    "00": {
      "value": "{spacing.8} * 0",
      "type": "spacing",
      "description": " "
    }
  }
}
我们需要做两件事:
- sizing的value加上单位px
- spacing的value需要转换成客户端能够识别的语法,可以是计算之后的具体值,也可以是
calc()。
使用Transform可以帮助我们解决这两个问题。
什么是Tranfrom?
Style Dictionary 中的Transform是用来修改token的函数。使用 Transform可以对token的name、value 或者 attribute 进行转换,从而实现适配输出不同平台的能力。比如,将pixel转换成point。可以使用内置的Transforms,也可以使用registerTransform方法注册自定义Transform。
具体该怎么做呢?
- 注册一个Transform。matcher用来过滤token,在transformer中实现核心转换逻辑。
StyleDictionary.registerTransform({
  name: 'size/px',
  type: 'value',
  transitive: true,
  matcher: token => {
    return ['spacing', 'sizing', 'lineHeights', 'borderRadius', 'fontSizes', 'borderWidth'].includes(token.type)
  },
  transformer: token => {
    const { value } = token;

    if (typeof value === 'string' && value?.includes('*')) {
      return `calc(${value})`
    } else if (!Number.isNaN(parseInt(value, 10)) && value.lastIndexOf('px') === -1) {
      return `${token.original.value}px`
    } else {
      return value
    }
  }
})
- 将 Tranform 加入到 TranformGroup 。
StyleDictionary.registerTransformGroup({
  name: 'custom/css',
  transforms: StyleDictionary.transformGroup['css'].concat([
    'size/px',
  ])
})
- 修改 config,将
platforms.css.transformGroup设置为注册的TransformGroup的名字
const StyleDictionary = require('style-dictionary')
const config = {
  'source': ['./tokens/**/*.json'],
  'platforms': {
    'css': {
      'transformGroup': 'custom/css',
      'buildPath': './output',
      'files': [
        {
          'destination': 'css/variables.css',
          'format': 'css/variables',
        }
      ]
    }
  }
}

StyleDictionary.extend(baseConfig)
StyleDictionary.buildAllPlatforms()
到这一步,我们已经将得到了想要的样式文件了。
为Token输出可阅读的文档
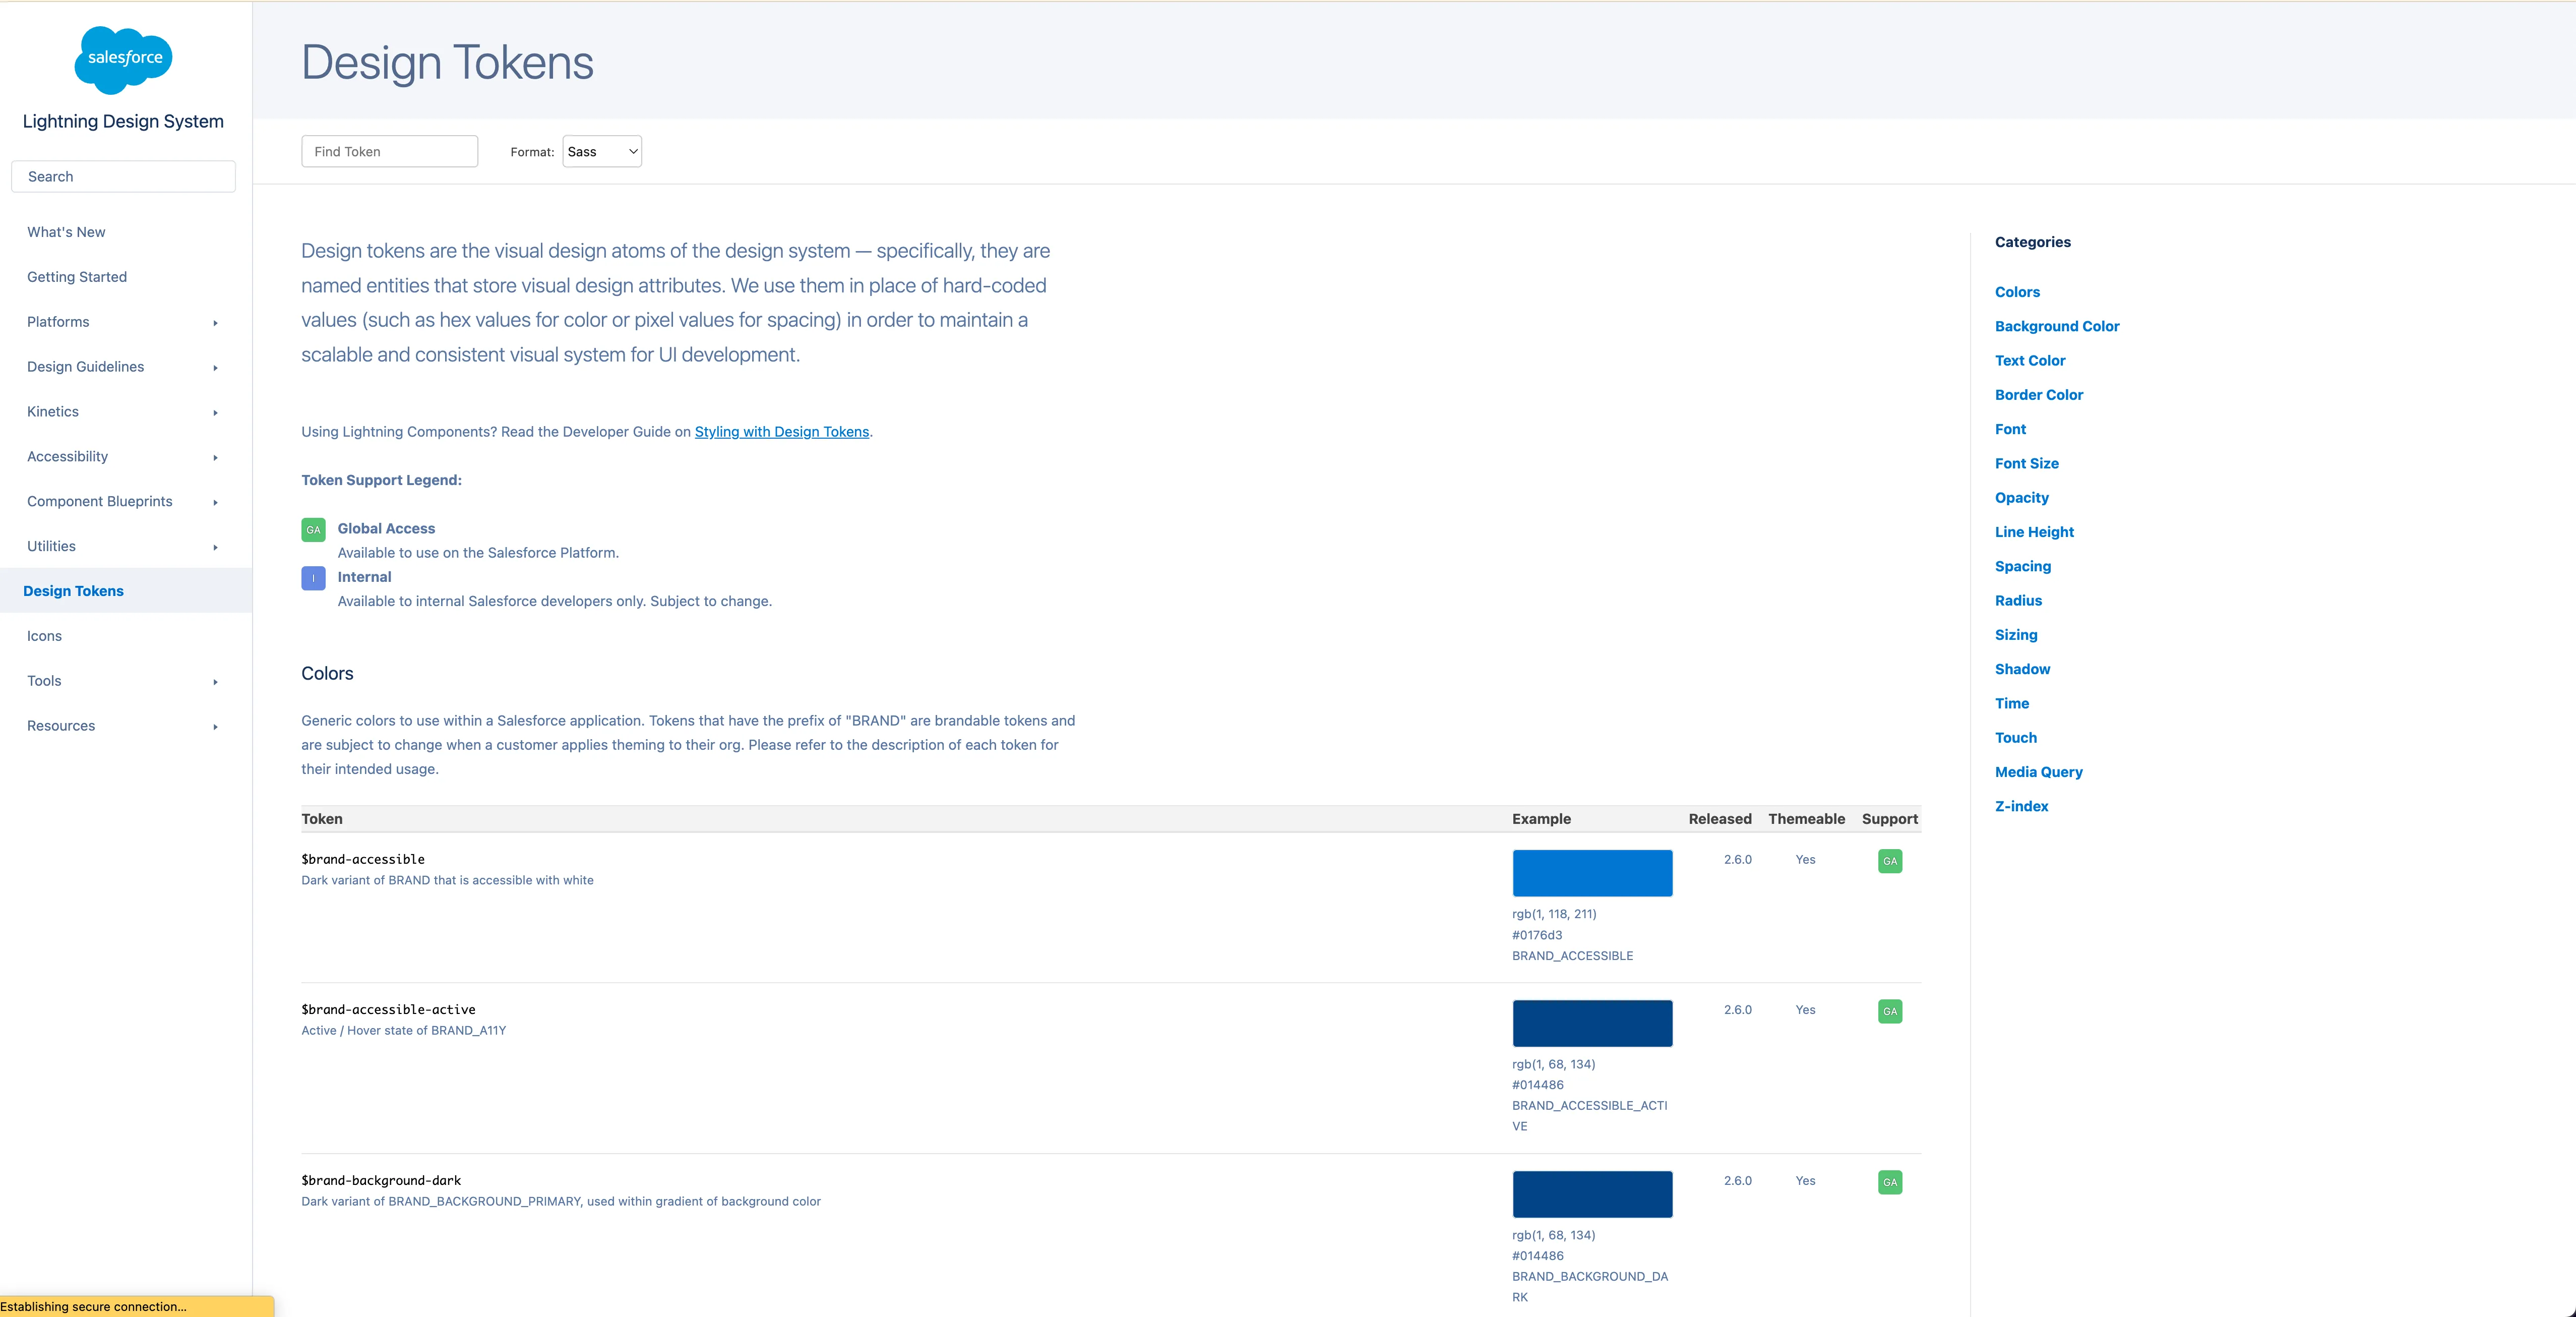
在 Design System 这个体系中,文档也是其中的一部分。而文档也包含了 Design Token 相关的内容。各公司的设计系统文档中,都有属于他们自己的Token文档,可以极大地方便开发者在开发中Token。例如:
Salesforce 的 Lightning Design System
Adobe 的 Spectrum

我们也需要在文档系统中展示Design Token相关的内容。
提取数据
仔细分析之后,你会发现:我们要做的事情就是按照我们的需求,将token中提供的信息再组装生产,成为文档需要的数据源,必要的时候还可以增加一下定制的内容。接下来,以Color为例,将Token源数据再组装为方便展示的数据。下图是源数据。

转换为
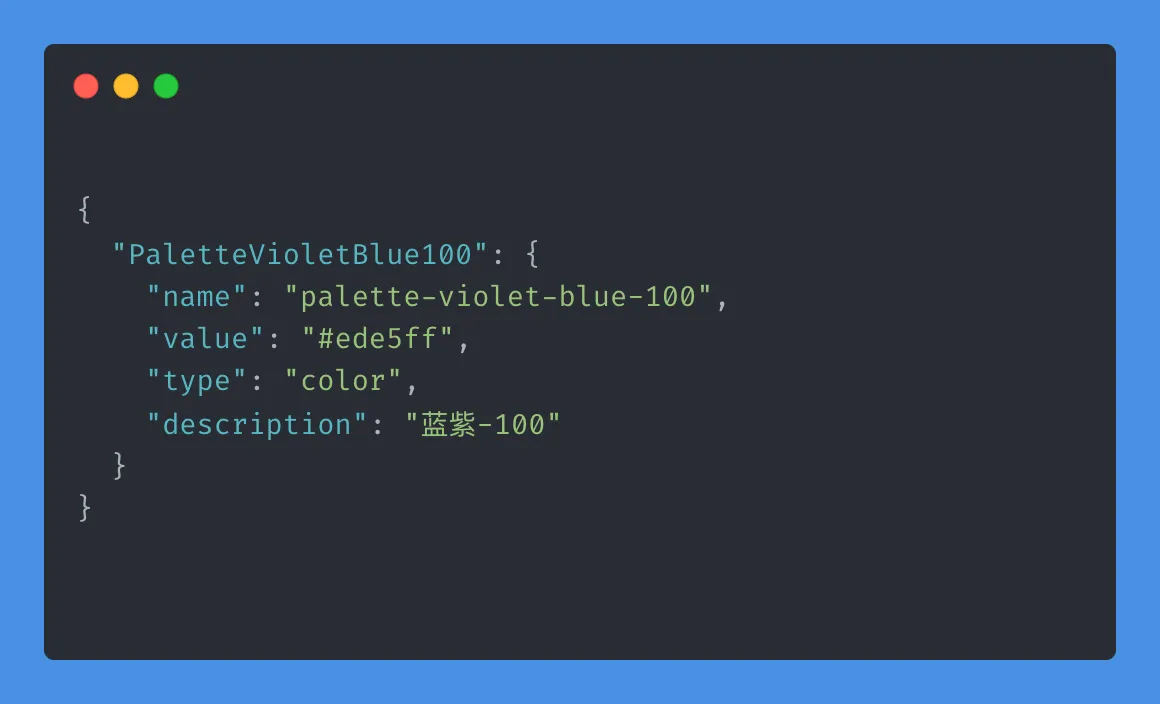
为此,需要实现一个Format,这个Format做的事情是遍历所有的Token,将引用的变量替换为对应的值,最后创建一个以Token.name为key的对象,其核心代码如下所示:
StyleDictionary.registerFormat({
  name: 'customFormat/json',
  formatter({ dictionary, file, options }) {
    const { outputReferences } = options;
    const res = {};

    dictionary.allTokens.map(token => {
      let value = JSON.stringify(token.value)

      if (dictionary.usesReference(token.original.value)) {
        const refs = dictionary.getReferences(token.original.value);

        refs.forEach(ref => {
          value = value.replace(ref.name, function () {
            return `var(--${ref.name})`;
          });
        });
      }

      res[token.name] = {
        name: token.name.replace(/\B([A-Z])|([0-9]\d*)/g, '-$1$2').toLowerCase(),
        value: JSON.parse(value),
        type: token.type,
        description: token.description || '',
      }
    })

    return JSON.stringify(res, null, 2);
  }
})
除此之外,为了解决上文提到的单位问题,需要再注册一个自定义TransformGroup。
StyleDictionary.registerTransformGroup({
  name: 'custom/json',
  transforms: StyleDictionary.transformGroup['js'].concat([
    'size/px',
  ])
})
最后在config中增加输出json的相关配置。
// index.js
const StyleDictionary = require('style-dictionary')
const config = {
  'source': ['./tokens/**/*.json'],
  'platforms': {
    'css': {
      'transformGroup': 'css',
      'buildPath': './output',
      'files': [
        {
          'destination': 'css/variables.css',
          'format': 'css/variables',
        }
      ]
    },
    'json': {
      'transformGroup': 'custom/json',
      'buildPath': './output',
      'files': [
        {
          'destination': 'json/variables.css',
          'format': 'css/variables',
        }
      ]
    }
  }
}

StyleDictionary.extend(baseConfig)
StyleDictionary.buildAllPlatforms()
自定义组件渲染
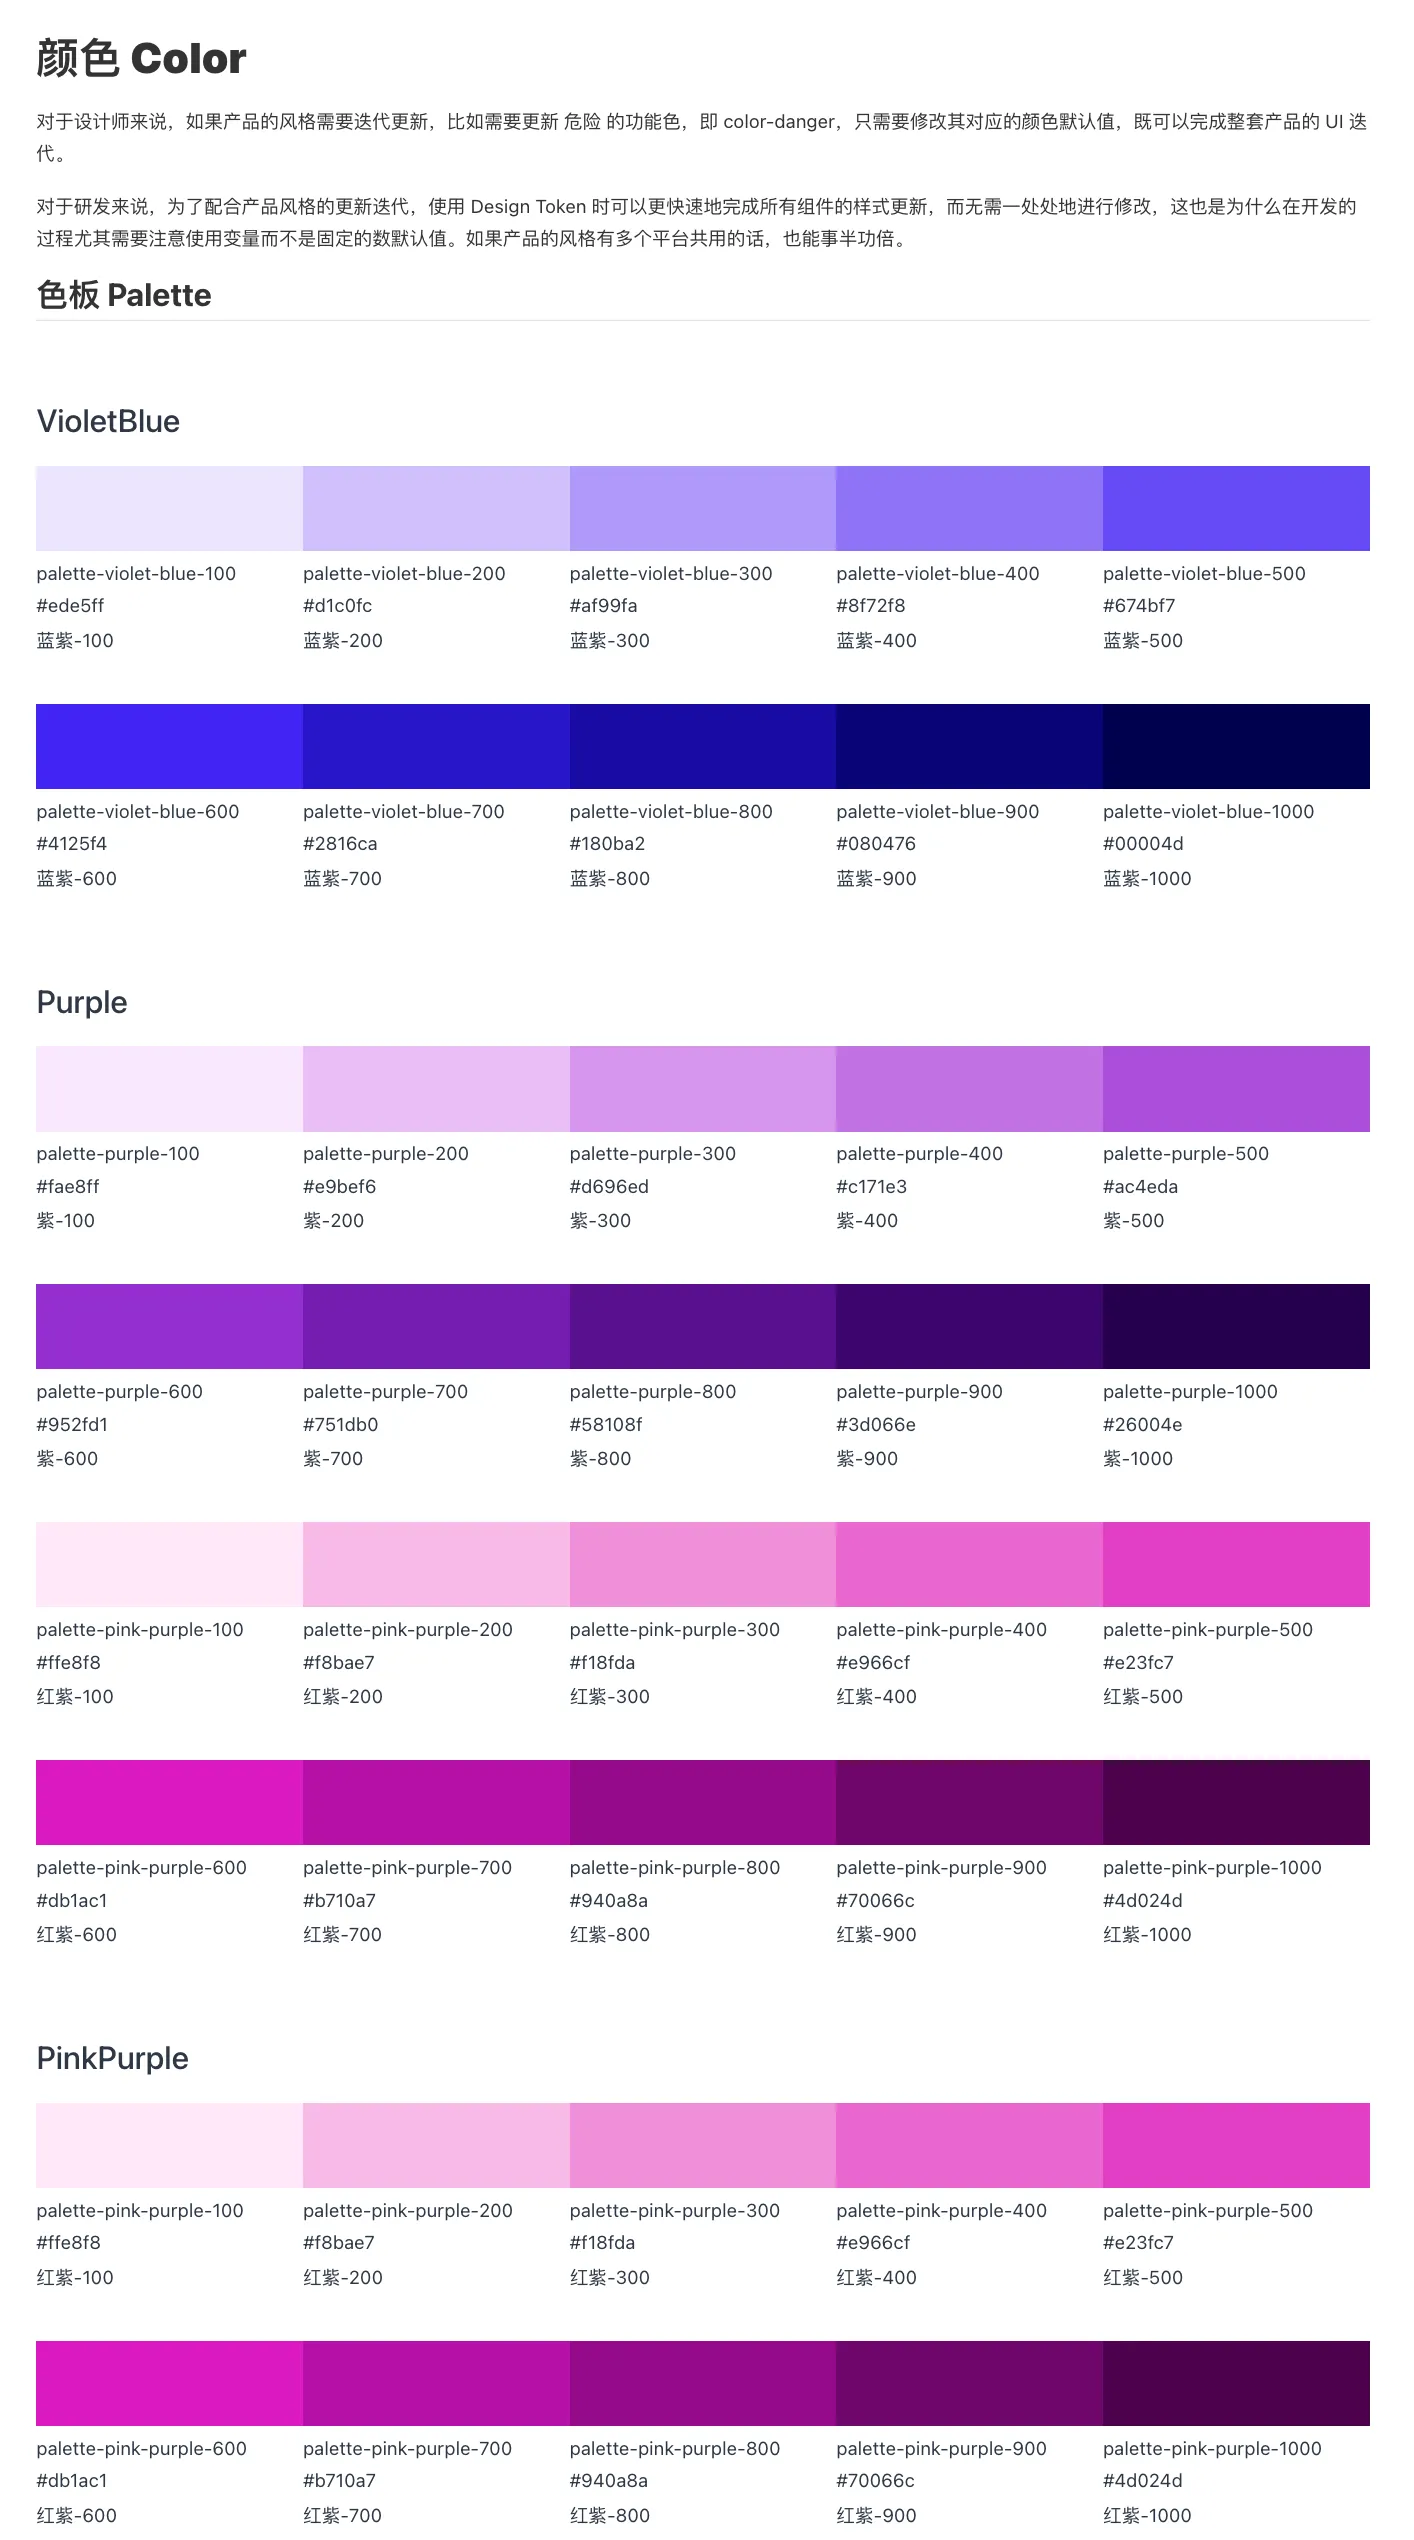
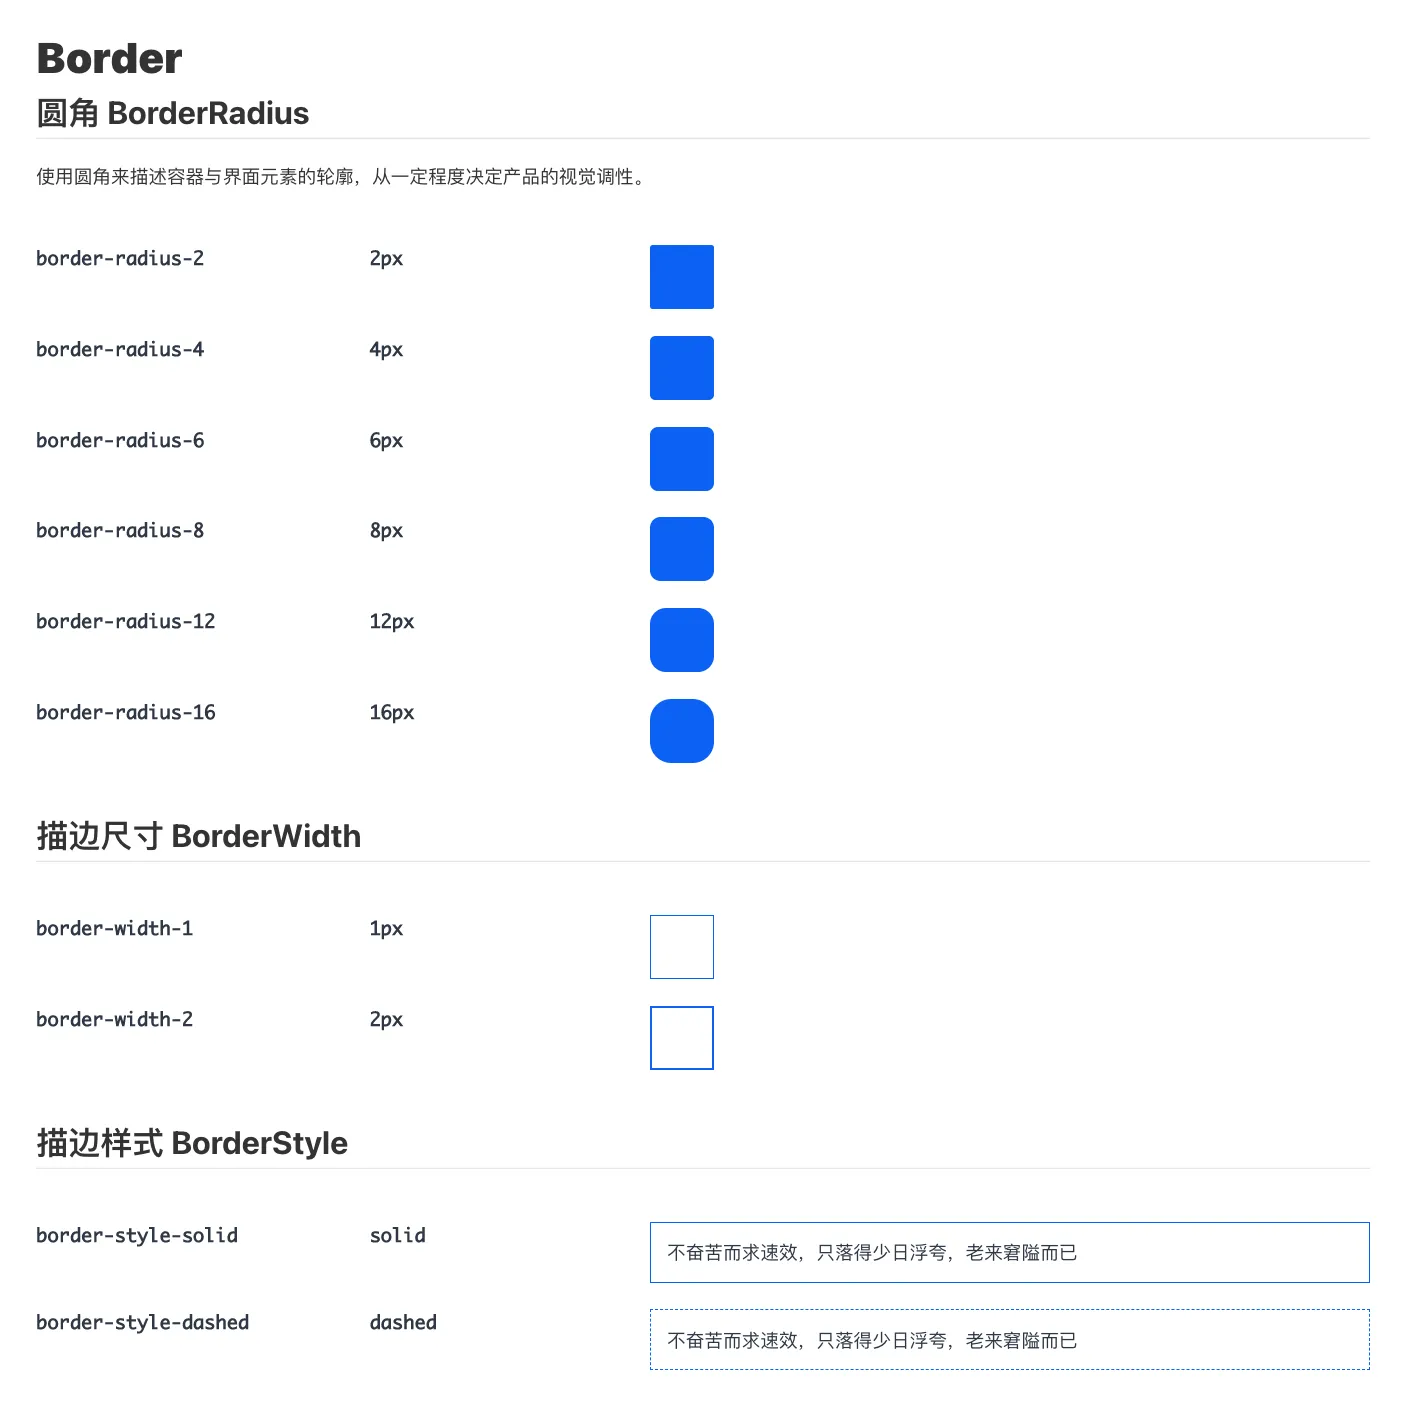
提取到了想要的数据结构之后,接下来的工作简直就是小菜一碟了。写几个组件,稍微加点逻辑,就可以实现文档展示了。我们的项目最后实际效果如下图。

结束语
目前团队中已经将Token应用在组件库的建设和业务开发,效果非常不错。后续会继续完善文档,增加一下交互操作,让开发者的使用体验更加舒适。除此之外,虽然token通过gitlab仓库管理,但是自动化的交付流程尚未健全,后续也是一个可以优化和提升的case。